TP-Link AX1500 Setup
Did your just purchase a brand new TP-Link AX1500 extender for your home network and want to configure it for the first time? If yes, then you have come to the right place. On this page, we will tell you about the two most effective methods to perform the TP-Link AX1500 setup. Plus, cover the important aspects that you must know. So, let’s dive in without further ado!
Methods for TP-Link AX1500 Setup
There are two ways to set up your TP-Link AX1500 extender at home. These methods are called the “Web Interface” and the “WPS Button.”
Web Interface: This is also known as the manual method. To do this, you need to open a specific website or dashboard on your computer using the default login information.
WPS Button: WPS stands for Wireless Protected Setup. In this method, you physically press the WPS button on the extender, and it will configure itself. This method only works with WPS authorized devices.
Now that you know about both methods, you can choose one that suits you best. If you want to learn the details of each method and install the TP-Link AX1500 extender easily, scroll down to read more.
Call Toll Free For Support: 1-844-765-4831
TP-Link AX1500 Setup via Web GUI
Here are the steps of web interface method that you can follow to configure the extender:
Initial Setup
The very first thing you need to do is reboot your host router so that it works properly during the extender setup. Below we give the instructions that you can use to reboot your device in right manner:
- First, turn the router off by pressing the power button.
- Second, remove the power cable from the socket.
- Third, keep wait for 5 minutes.
- Fourth, plug the router and turn it on by pressing the power button.
Now you router is rebooted successfully. You can proceed further to extend the home network.
Step 1: Placement of TP-Link AX1500
- Now you need to look for the right place for the extender near the host router.
- The location you will choose should have a working wall outlet.
Step 2: Connect Extender to Router
- Make the strong connection between the extender and router.
- To make the connection, you can use Ethernet cable or wireless mode.
- But, we suggest you use the Ethernet cable because it reduces the chances of disconnection.
- Inert the one end of the cable into the extender and another into the host router.
Step 3: Power on TP-Link AX1500
- Now, turn on your extender by plugging it into the working wall outlet.
- Press the power button.
- Wait for couple of seconds until the device blinks light.
- Once the device is booted up, proceed further.
Step 4: Connect Computer to Extender Network
- Power on your device like computer or laptop.
- Open the network list of your device.
- You will see the network namely “TP-Link –AX1200”.
- Click on it to connect to it.
Step 5: Open Web Browser
- The next step you need to follow is to launch the internet browser.
- The browser should be running on its updated version.
- You can use any one of these Mozilla, Firefox, Chrome, or Bing.
Step 6: Access Default URL or IP Address
- Now type tplinkrepeater.net or “192.168.0.254” into the address bar.
- Avoid making typos, otherwise you may face issues to access the address.
- Press the Enter key to reach the login portal.
Step 7: Log In to Extender
- The login fields will appear on your screen.
- Fill the default username and password into the fields.
- Click on the Login button.
Step 8: Configured TP-Link AX1500
The dashboard of the extender will appear in which you need to follow the sub steps that mentioned below:
- Go to the System Tools.
- Select the Setup Wizard.
- Follow the on-screen instructions.
Congratulation! TP-Link AX1500 setup has been successfully done. Now you will enjoy the blazing fast internet throughout your house.
TP-Link AX1500 Setup via WPS Button
Here are the steps of WPS button that you can use to configured TP-Link AX1500 extender:
- Ensure that your device is powered on successfully.
- Look for the WPS button on the router as well as on the extender.
- Press the button one by one on both the device.
- Hold the WPS button for couple of seconds until the device blink light.
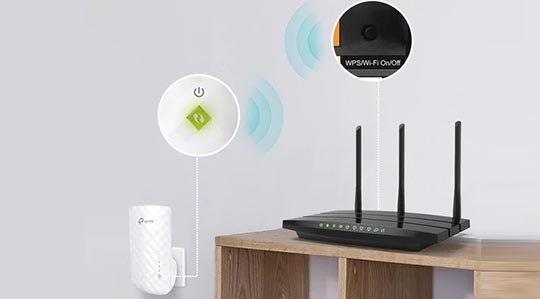
Now your extender is configured properly via WPS button.
Thus, by following above mentioned methods you can perform TP-Link AX1500 setup. In case you face any issue while configuration then take the help of user manual for the instant help.